Saturday, 27 October 2018

Scatter Terrain

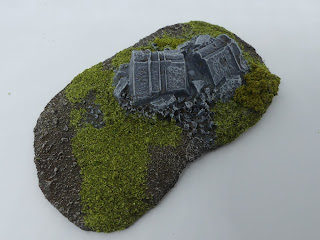
I started this terrain before Armies on Parade but had to shelve it to make the display board so finished up a bit later than originally planned.

All credit for this goes to Mel the Terrain Tutor, whose excellent tutorials gave me the know-how to do this:
I'm very pleased with the results, and it's also held up well to being chucked in a cupboard for storage! In total there are 16 pieces of terrain, with the smallest about 2" in diameter and the largest about 12"x6"

Medium Ruin


Small Ruin

Medium Tree Stand

Medium Ruin

Stone wall

Small Ruin

Large Hillock

Rocky ground

Small tree stand

Small ruin

Small tree stand (spring green flock = not great!)

Small Ruin

Small terrain piece

Larger corner piece

Small ruin

Largest ruin

For future reference, the materials used are as follows:
  • Bases: Corrugated cardboard packaging + Wickes Polyfiller
    • Worked well, more time consuming than expected but would definitely use again
  • Ruins: Games Workshop LOTR Ruins (discontinued)
    • I'd accumulated a lot of these and am very pleased how they turned out. Ruins of Osgiliath would be the closest current equivalent
  • Flock: Javis scenic scatter Rough Pasture (#JS19) & Spring Green (#71). The rough pasture was good, but the Spring Green is much too bright for my liking. I also used some Battlefields Grass Green (excellent) and some older lighter flock (which I would guess was from GW)
  • Hedges: Javis Hedge Foliage Light Green (#JHF1) & Mid Green (#JHF2)
  • Trees: Ebay 20x 7cm Green Trees20 x 9cm Green Trees & 10x 11cm / 9cm Bendable Trees. In terms of realism, only the 11cm trees are anywhere near the right scale, but if you ignore that fact they look pretty good for what I paid for them
Sort of believable with a foot model...

Definitely not believable with a mounted model!


Saturday, 20 October 2018

Armies on Parade 2018


In one of my crazier plans I decided that having started painting my Army of the Dead on the 6th October it would be totally possible to get them ready for Armies on Parade on the 13th. It turns out it definitely was possible, but I had to cut a lot of corners putting the board together so whilst it made it to the event it's unlikely to ever be used again. Still, I was very pleased I put the effort in as it gave me a real boost to have something to take to the store as tangible proof that I was actually enjoying my hobby again.

The board was constructed on a 2x2 sheet of MDF that I had in storage (as you do) with a 1x1 removable back corner piece designed to be removed and stored in my display cabinet after the event. I knew that the board as a whole was unlikely to be kept so I thought it would be nice to keep a piece as a display for my Army and I'm pleased to say this worked very well.
The board was roughed out with cheap polystyrene hacked into shape with a craft knife and then covered in polyfiller. Because I only had 2 evenings to build this beast I gave it a couple of hours to start drying and then used PVA to fix down some rocks / bigger scatter and then covered the whole thing in a good layer of brown & black poster paints mixed with pva and kiln dried sand to give it some texture then left it overnight to dry.
The next day it was mostly dry so I painted the rocks grey before I went to work and then gave the whole thing a good drybrushing with a light brown paint for the soil / light grey for the rocks when I got home. After dinner I applied liberal amounts of static grass (Army Painter Steppe Grass) and chiselled out some space at the front to add a nice quote from the Lord of the Rings books to give it some context.

I forgot to take a picture of the final piece (and damaged it a bit getting it home) so this is the best picture I have of the finished product


When I got home I carefully removed the back-left segment and installed this in my display cabinet where it will now reside permanently.

Saturday, 13 October 2018

Painting the Army of the Dead

These guys were a pleasure to paint as they require absolutely no detail work at all!


Painting Recipe is as follows for future reference:

  • Prime with Skull White (Corax White) Spray
  • Basecoat with Corax White (just filling in anywhere the spray missed)
  • Wash with Hexwraith Flame and apply patches of Coelia Greenshade to break it up
  • Drybrush with Ulthuran Grey
Basing
  • Stirland Mud
  • Drybrush with Tyrant Skull
  • Add Grass Tufts (Serious Play 6mm Mini Tufts / 4mm Tufts in 'Winter')

Saturday, 6 October 2018

2018 - September Update

After years of hobby stagnation I'm finally digging out my paints again and getting back into Middle Earth in a big way. I decided to take the plunge and pick up the new Pelennor Fields box-set.


Holidays prevented me from doing much painting this month, but I have built all of the Army of the Dead and the Morannon Orcs and we even managed to squeeze in our first ever game across the dining table (wherein my Riders of Rohan were soundly prevented from carrying warning to Minas Tirith by some surprisingly resilient Morannon Orcs).

I did half-paint 12 warriors of Minas Tirith + Cirion, but I didn't' finish them so I don't think they count!

I also took inventory of my model stash and determined that I have approximately 1,300 models / 30,000 points worth of Armies in my collection. I'm giving myself a pass this month, but in the future my aim is to paint more models than I buy - gotta start chipping away at that backlog!

Summary:
Bought: 84 models
Painted: None.